
GridDragSort — HarmonyOS 网格拖拽场景
项目地址:https://gitcode.com/harmonyos_samples/grid-drag-sort 技术栈:HarmonyOS / ArkTS / ArkUI
项目简介
在移动应用开发中,网格布局(Grid)是一种常见且高效的界面组织方式,广泛应用于相册、设备管理、应用桌面等场景。而网格元素的拖拽排序功能,则为用户提供了直观、灵活的内容组织能力,是提升交互体验的重要手段。
GridDragSort 是 HarmonyOS 官方示例项目,专注于展示基于 Grid 组件的四大网格拖拽排序场景:
- 相同大小元素长按拖拽:九宫格等分布局,长按后拖拽交换排序
- 不同大小元素长按拖拽:大小卡片混合布局,支持跨尺寸拖拽交换
- 直接拖拽(无需长按):轻触即可拖拽,适合高频排序场景
- 抖动动画编辑模式:长按进入编辑模式,元素抖动并显示删除按钮
本项目通过 Grid 容器组件、组合手势(GestureGroup)和显式动画(animateTo)的有机结合,实现了流畅自然的拖拽交互体验。
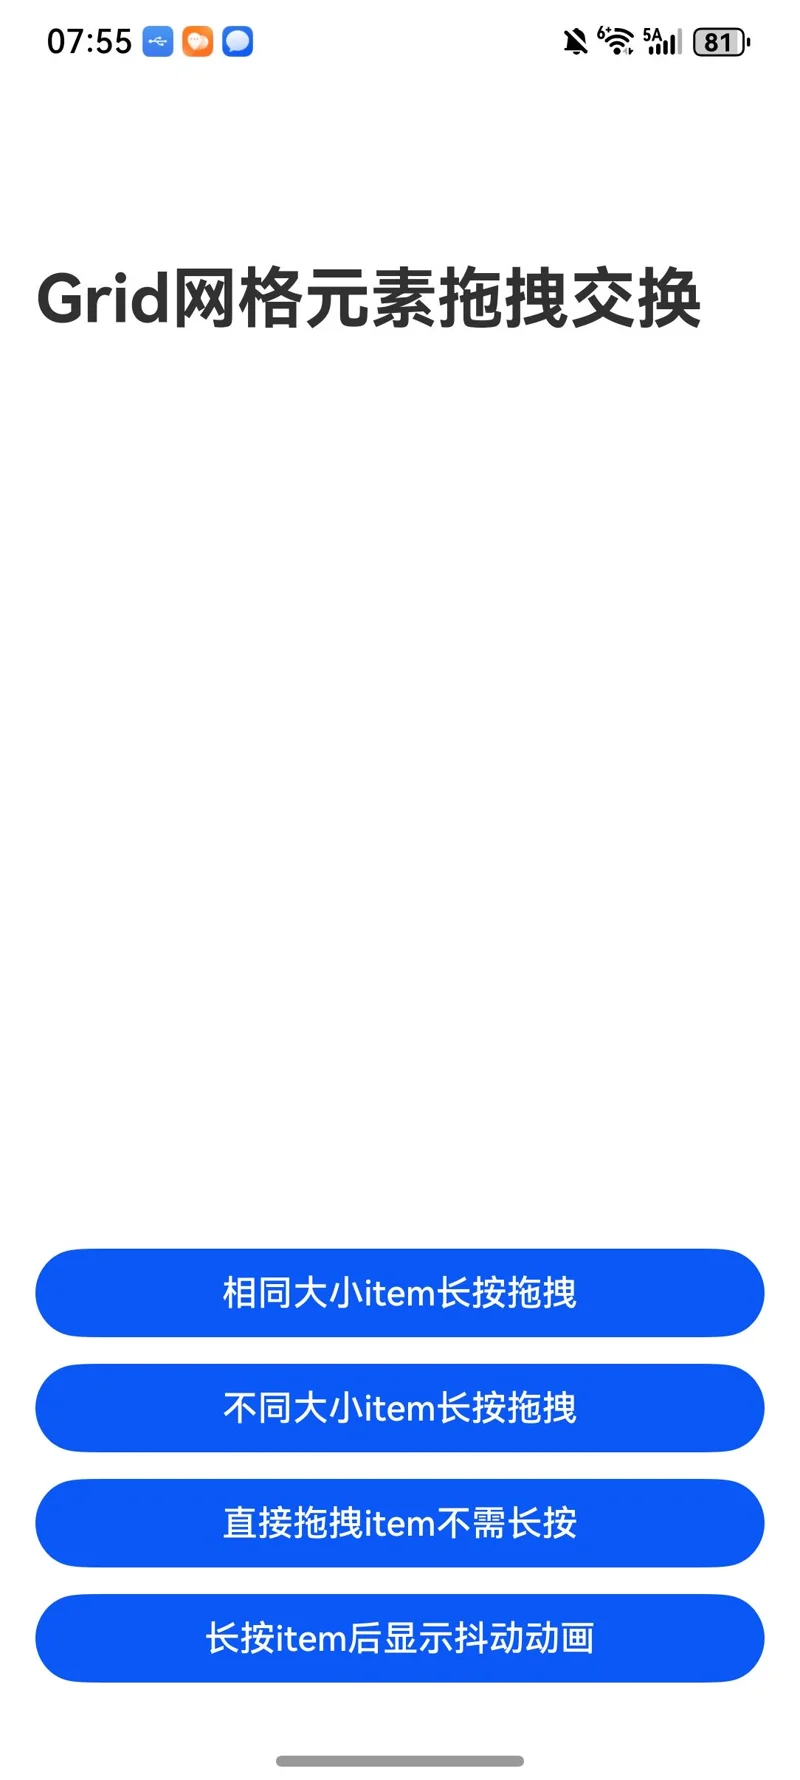
上图展示了应用首页,四个按钮分别对应四大拖拽排序场景。
功能概览
| 场景 | 核心组件 | 关键技术 |
|---|---|---|
| 相同大小元素拖拽 | Grid + GridItem | editMode + supportAnimation |
| 不同大小元素拖拽 | Grid + GestureGroup | LongPressGesture + PanGesture |
| 直接拖拽 | Grid + PanGesture | 单手势直接拖拽 |
| 抖动动画 | Grid + animateTo | 循环动画 + 编辑模式 |
工程结构
entry/src/main/ets
├── entryability
│   └── EntryAbility.ets              // 程序入口
├── entrybackupability
│   └── EntryBackupAbility.ets        // 备份能力
└── pages
    ├── Index.ets                     // 首页(导航入口)
    ├── SameItemDrag.ets              // 相同大小元素拖拽场景
    ├── DifferentItemDrag.ets         // 不同大小元素拖拽场景
    ├── DirectDragItem.ets            // 直接拖拽场景
└── JitterAnimation.ets // 抖动动画场景核心实现解析
场景一:相同大小元素长按拖拽(SameItemDrag.ets)
相同大小元素拖拽场景模拟了相册九宫格编辑功能。用户长按任意图片后,可以拖拽与其他图片交换位置,拖拽过程中其他图片会自动调整位置。

上图展示了相同大小元素的九宫格布局,包含用户信息、文字描述和 3x3 图片网格。
核心代码:
Grid() {
  ForEach(this.numbers, (item: number) => {
    GridItem() {
      Image($r(`app.media.image${item}`))
        .width('100%')
        .height(this.curBp === 'md' ? 131 : 105)
        .draggable(false)
        .animation({ curve: Curve.Sharp, duration: 300 })
    }
  }, (item: number) => item.toString())
}
.width(this.curBp === 'md' ? '66%' : '100%')
.scrollBar(BarState.Off)
.columnsTemplate('1fr 1fr 1fr')
.columnsGap(this.curBp === 'md' ? 6 : 4)
.rowsGap(this.curBp === 'md' ? 6 : 4)

// 启用编辑模式和动画支持
.editMode(true)
.supportAnimation(true)

// 拖拽开始回调
.onItemDragStart((_, itemIndex: number) => {
  this.imageNum = this.numbers[itemIndex];
  return this.pixelMapBuilder();
})

// 拖拽放置回调
.onItemDrop((_, itemIndex: number, insertIndex: number, isSuccess: boolean) => {
  if (!isSuccess || insertIndex >= this.numbers.length) {
    return;
  }
  this.changeIndex(itemIndex, insertIndex);
})数据交换方法:
changeIndex(index1: number, index2: number) {
  let tmp = this.numbers.splice(index1, 1);
  this.numbers.splice(index2, 0, tmp[0])
}技术要点:
editMode(true):启用 Grid 的编辑模式,允许元素拖拽supportAnimation(true):启用拖拽动画,让元素移动更流畅onItemDragStart:拖拽开始时构建跟随手指移动的预览组件(pixelMapBuilder)onItemDrop:拖拽结束时交换数据数组中的元素位置animation:为每个GridItem添加过渡动画,使位置变化更自然
场景二:不同大小元素长按拖拽(DifferentItemDrag.ets)
不同大小元素拖拽场景模拟了智能家居设备管理界面。网格中包含一个大尺寸卡片(占据两行)和多个小尺寸卡片,用户长按后可以拖拽交换位置,系统会自动处理大小卡片的位置计算。
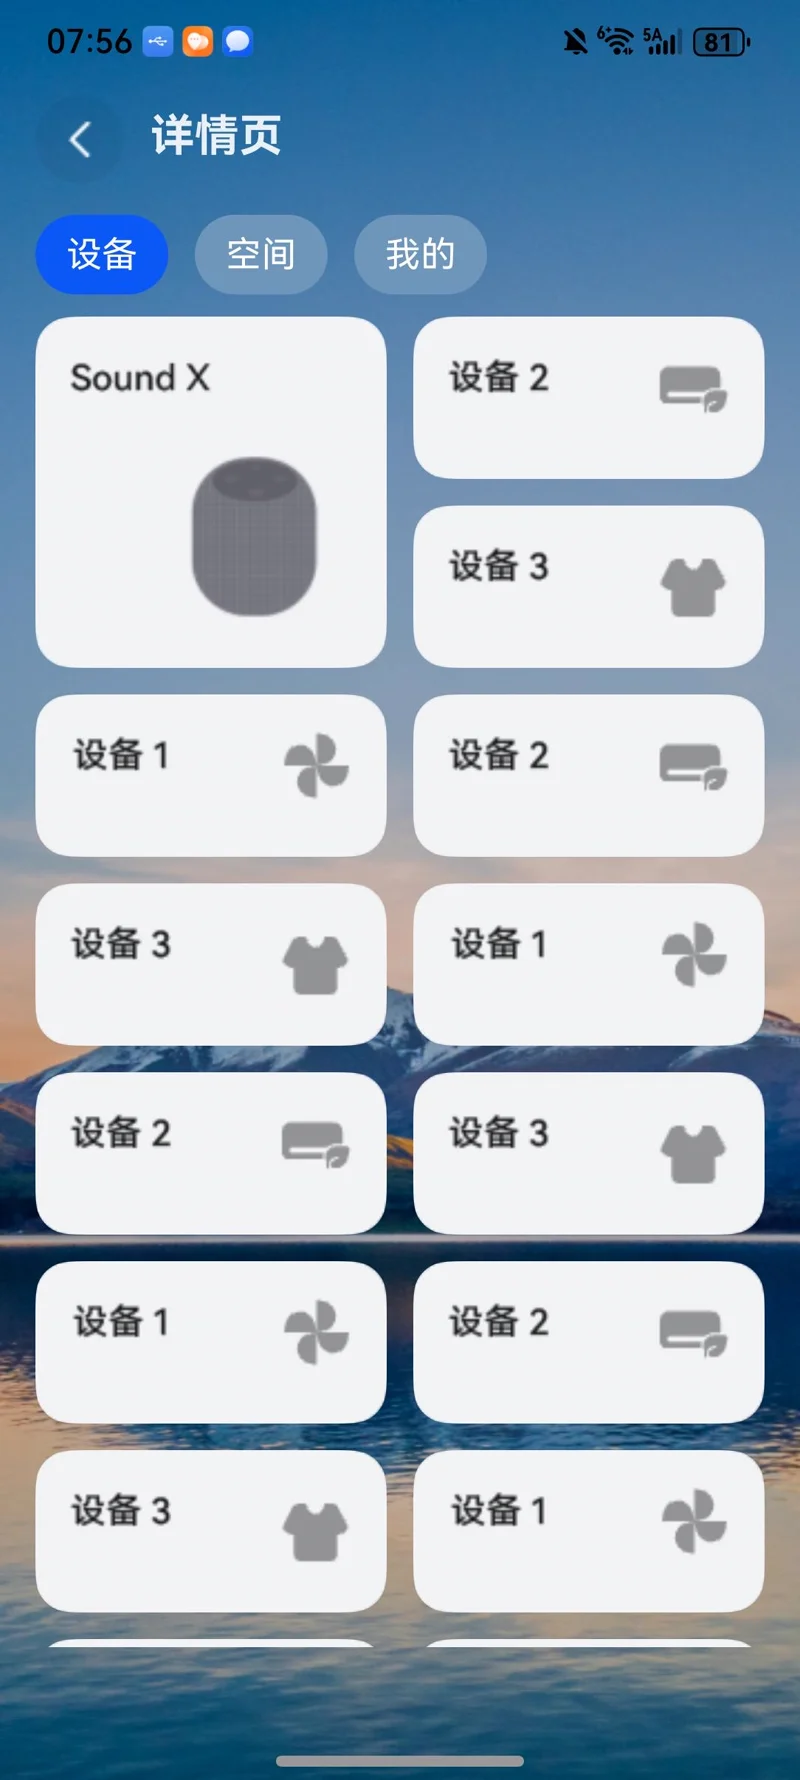
上图展示了不同大小元素的设备网格布局,左侧 Sound X 为大卡片,右侧为多个小卡片。
核心代码:
Grid() {
  ForEach(this.numbers, (item: number) => {
    GridItem() {
      Stack({ alignContent: Alignment.TopEnd }) {
        Image(this.changeImage(item))
          .width('100%')
          .borderRadius(16)
          .objectFit(this.curBp === 'md' ? ImageFit.Fill : ImageFit.Cover)
          .draggable(false)
          .animation({ curve: Curve.Sharp, duration: 300 })
      }
    }
    .rowStart(0)
    .rowEnd(this.getRowEnd(item))  // 大卡片占据两行
    .scale({ x: this.scaleItem === item ? 1.02 : 1, y: this.scaleItem === item ? 1.02 : 1 })
    .zIndex(this.dragItem === item ? 1 : 0)
    .translate(this.dragItem === item ? { x: this.offsetX, y: this.offsetY } : { x: 0, y: 0 })
    .gesture(
      GestureGroup(GestureMode.Sequence,
        LongPressGesture({ repeat: true })
          .onAction(() => {
            this.getUIContext().animateTo({ curve: Curve.Friction, duration: 300 }, () => {
              this.scaleItem = item;
            })
          })
          .onActionEnd(() => {
            this.getUIContext().animateTo({ curve: Curve.Friction, duration: 300 }, () => {
              this.scaleItem = -1;
            })
          }),
        PanGesture({ fingers: 1, direction: null, distance: 0 })
          .onActionStart(() => {
            this.dragItem = item;
            this.dragRefOffSetX = 0;
            this.dragRefOffSetY = 0;
          })
          .onActionUpdate((event: GestureEvent) => {
            this.offsetX = event.offsetX - this.dragRefOffSetX;
            this.offsetY = event.offsetY - this.dragRefOffSetY;
            this.getUIContext().animateTo({
              curve: curves.interpolatingSpring(0, 1, 400, 38)
            }, () => {
              let index = this.numbers.indexOf(this.dragItem);
              // 根据偏移量判断移动方向并交换位置
              if (this.offsetY >= this.FIX_VP_Y / 2) {
                this.down(index);
              } else if (this.offsetY <= -this.FIX_VP_Y / 2) {
                this.up(index);
              } else if (this.offsetX >= this.FIX_VP_X / 2) {
                this.right(index);
              } else if (this.offsetX <= -this.FIX_VP_X / 2) {
                this.left(index);
              }
            })
          })
          .onActionEnd(() => {
            // 拖拽结束,重置状态
            this.getUIContext().animateTo({
              curve: curves.interpolatingSpring(0, 1, 400, 38)
            }, () => {
              this.dragItem = -1;
            })
          })
      )
    )
  })
}
.columnsTemplate('1fr 1fr')
.editMode(true)
.supportAnimation(true)技术要点:
GestureGroup(GestureMode.Sequence):使用序列手势组合,先长按(LongPressGesture)后拖拽(PanGesture)rowStart/rowEnd:通过设置行起始和结束位置,实现大卡片占据多行- 方向判断逻辑:在
onActionUpdate中根据偏移量判断上下左右四个方向的移动 - 弹性动画:使用
curves.interpolatingSpring创建弹簧效果,让交互更有质感 - 位置计算:
FIX_VP_X和FIX_VP_Y定义了网格单元格的固定尺寸,用于判断移动阈值
场景三:直接拖拽(DirectDragItem.ets)
直接拖拽场景省去了长按步骤,用户手指轻触元素即可直接拖拽。这种交互方式适合需要频繁调整顺序的场景,如桌面图标整理。

上图展示了直接拖拽场景,5 个空间设备卡片以 4 列网格排列,无需长按即可直接拖拽。
核心代码:
Grid() {
  ForEach(this.numbers, (item: number) => {
    GridItem() {
      Column() {
        Image($r(`app.media.space${item}`))
          .width(44)
          .height(44)
          .draggable(false)
        Image($r('app.media.space_bottom'))
          .width(16)
          .height(16)
          .draggable(false)
      }
      .width('100%')
      .height(73)
      .justifyContent(FlexAlign.Center)
      .borderRadius(10)
      .backgroundColor('#F1F3F5')
      .animation({ curve: Curve.Sharp, duration: 300 })
    }
    .scale({ x: this.scaleItem === item ? 1.05 : 1, y: this.scaleItem === item ? 1.05 : 1 })
    .zIndex(this.dragItem === item ? 1 : 0)
    .translate(this.dragItem === item ? { x: this.offsetX, y: this.offsetY } : { x: 0, y: 0 })
    .gesture(
      PanGesture({ fingers: 1, direction: null, distance: 0 })
        .onActionStart(() => {
          this.dragItem = item;
          this.dragRefOffSetX = 0;
          this.dragRefOffSetY = 0;
        })
        .onActionUpdate((event: GestureEvent) => {
          this.offsetX = event.offsetX - this.dragRefOffSetX;
          this.offsetY = event.offsetY - this.dragRefOffSetY;
          this.getUIContext().animateTo({
            curve: curves.interpolatingSpring(0, 1, 400, 38)
          }, () => {
            let index = this.numbers.indexOf(this.dragItem);
            // 支持上下左右及四个对角线方向的移动
            if (this.offsetY >= this.FIX_VP_Y / 2) {
              this.down(index);
            } else if (this.offsetY <= -this.FIX_VP_Y / 2) {
              this.up(index);
            } else if (this.offsetX >= this.FIX_VP_X / 2) {
              this.right(index);
            } else if (this.offsetX <= -this.FIX_VP_X / 2) {
              this.left(index);
            } else if (this.offsetX >= this.FIX_VP_X / 2 && this.offsetY >= this.FIX_VP_Y / 2) {
              this.lowerRight(index);
            }
            // ... 其他对角线方向
          })
        })
        .onActionEnd(() => {
          this.getUIContext().animateTo({
            curve: curves.interpolatingSpring(0, 1, 400, 38)
          }, () => {
            this.dragItem = -1;
          })
        })
    )
  })
}
.columnsTemplate(this.curBp === 'md' ? '1fr 1fr 1fr 1fr 1fr' : '1fr 1fr 1fr 1fr')
.editMode(true)技术要点:
- 单手势拖拽:仅使用
PanGesture,无需LongPressGesture,实现轻触即拖 - 八方向移动:支持上下左右及四个对角线方向的移动判断
- 响应式布局:根据断点(
curBp)动态调整列数,平板显示 5 列,手机显示 4 列 - 视觉反馈:拖拽时元素放大(
scale)并提升层级(zIndex)
场景四:抖动动画(JitterAnimation.ets)
抖动动画场景模拟了应用桌面编辑模式。用户长按任意元素后,所有元素进入编辑状态并开始抖动,同时显示删除按钮,点击空白区域退出编辑。

上图展示了抖动动画场景,长按后元素进入编辑模式,显示删除按钮并伴随抖动效果。
核心代码:
// 抖动动画方法
private jumpWithSpeed(speed: number) {
  if (this.isEdit) {
    this.rotateZ = -1;
    this.getUIContext().animateTo({
      delay: 0,
      tempo: speed,
      duration: 1000,
      curve: Curve.Smooth,
      playMode: PlayMode.Normal,
      iterations: -1  // 无限循环
    }, () => {
      this.rotateZ = 1;
    })
  } else {
    this.stopJump();
  }
}

// 停止抖动
private stopJump() {
  this.getUIContext().animateTo({
    delay: 0,
    tempo: 5,
    duration: 0,
    curve: Curve.Smooth,
    playMode: PlayMode.Normal,
    iterations: 1
  }, () => {
    this.rotateZ = 0;
  })
}

// GridItem 旋转动画
GridItem() {
  Stack({ alignContent: Alignment.TopEnd }) {
    Column() {
      Image($r(`app.media.space${item}`))
        .width(44)
        .height(44)
        .draggable(false)
    }
    .width('100%')
    .height(73)
    .justifyContent(FlexAlign.Center)
    .borderRadius(10)
    .backgroundColor('#F1F3F5')

    // 编辑模式下显示删除按钮
    if (this.isEdit) {
      Image($r('app.media.close'))
        .width(20)
        .height(20)
        .onClick(() => {
          this.getUIContext().animateTo({ duration: 300 }, () => {
            this.numbers = this.numbers.filter((element) => element !== item);
          })
        })
    }
  }
}
.rotate({
  z: this.rotateZ,
  angle: 1,
  centerX: '50%',
  centerY: '50%'
})
.gesture(
  GestureGroup(GestureMode.Sequence,
    LongPressGesture({ repeat: true })
      .onAction(() => {
        if (!this.isEdit) {
          this.isEdit = true;
          this.jumpWithSpeed(5);
        }
      }),
    PanGesture({ fingers: 1, direction: null, distance: 0 })
      .onActionUpdate((event: GestureEvent) => {
        // 拖拽时停止抖动,拖拽结束恢复抖动
        this.stopJump();
        // ... 拖拽逻辑
        this.jumpWithSpeed(5);
      })
  )
)技术要点:
rotate属性:通过改变rotateZ值实现元素的左右摆动animateTo无限循环:设置iterations: -1让抖动动画持续播放- 编辑状态管理:
isEdit状态变量控制删除按钮的显示/隐藏 - 长按触发:
LongPressGesture触发编辑模式,同时启动抖动动画 - 点击退出:在
Scroll的onClick中监听空白区域点击,退出编辑模式
运行效果
以下是四个场景的实际运行截图:
| 相同大小拖拽 | 不同大小拖拽 |
|---|---|
| |
| 直接拖拽 | 抖动动画 |
|---|---|
| |
总结
GridDragSort 项目通过四个典型场景,全面展示了 HarmonyOS Grid 组件的拖拽排序能力:
editMode+supportAnimation:开启 Grid 原生拖拽支持,一行代码实现基础拖拽GestureGroup组合手势:通过长按+拖拽的组合,实现更精细的交互控制PanGesture单手势:适用于高频操作场景,减少用户操作步骤animateTo显式动画:为拖拽过程添加弹性动画和抖动效果,提升交互质感
这些技术不仅适用于示例中的场景,也可以灵活应用到相册管理、桌面整理、设备控制等各类网格布局应用中。对于正在学习 HarmonyOS 开发的开发者来说,这是一个深入理解手势交互和动画系统的优质示例项目。